Expert Guide - How To Create And Schedule A LinkedIn Post On Vulse
- How-To Guides|
- LinkedIn Strategy

Are you ready to improve your LinkedIn output?
Scheduling posts on Vulse is simple with our easy-to-follow guide.
Whether you're a seasoned professional or just dipping your toes into the world of LinkedIn content creation, these steps will have you scheduling engaging posts in no time.
Let's dive in and make your life easier than ever.
Step 1: Get Started with a smile - How to schedule a LinkedIn post
First things first, pop over to the Vulse dashboard by clicking the link: Vulse Dashboard. Make sure you're logged in to get the party started with your post creation.
Step 2: Let's Create a New LinkedIn Post
Once you’re in, keep an eye out for a button that says “Create New Post” in the top right corner. Click it and you’re on your way to sharing your amazing ideas.
It's crucial to consider the type of LinkedIn content that performs well, ensuring your posts contribute to a strategic content calendar for better engagement and follower growth.
Step 3: Give us a sneak peek with a LinkedIn headline
Next up, you'll see a spot to write a snappy summary of your post. Keep it short and sweet—no more than 140 characters. Imagine you’re tweeting your heart out.
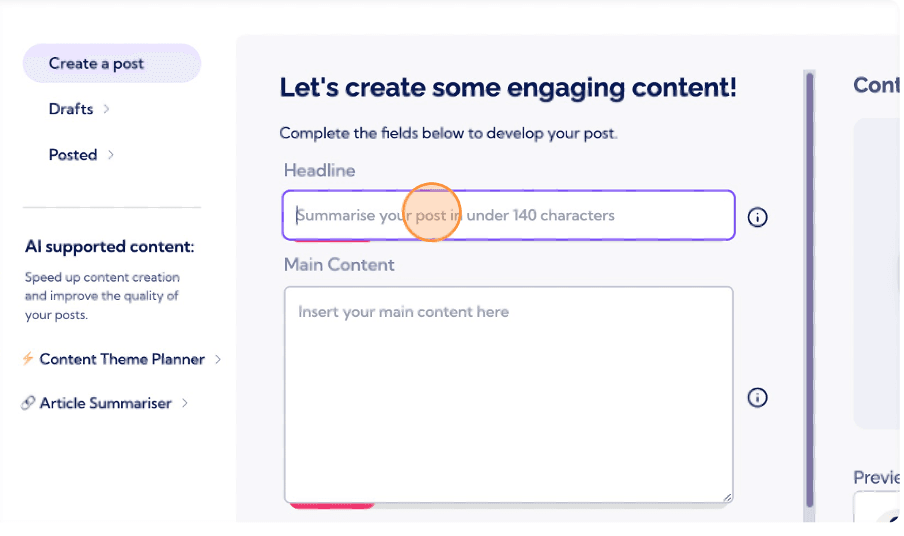
Step 4: Spill the beans
Now for the main event: the content of your post, especially when it comes to LinkedIn posts. This is where you can let your creativity flow and focus on optimizing for engagement and relevance. Fill in all the juicy details that will engage your readers.

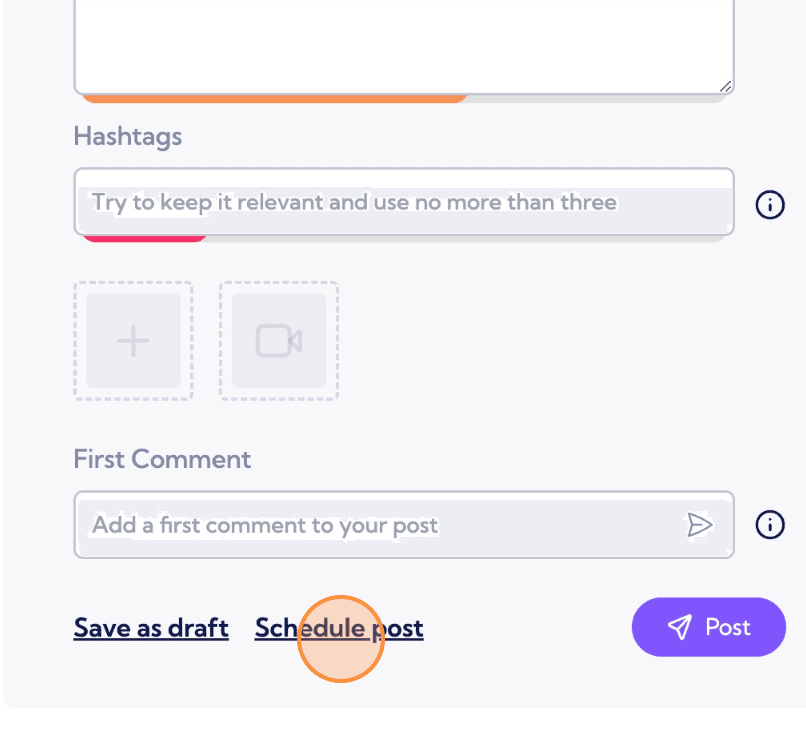
Step 5: Hashtag, You’re It!
Don’t forget to tag your post when you schedule LinkedIn posts. Tags are like little helpers that make sure your post gets seen by the right eyes. After setting a scheduled date, you have the option to view and edit scheduled LinkedIn posts, ensuring everything is perfectly aligned with your content strategy before it goes live. This flexibility is crucial for maintaining an active presence on LinkedIn, as scheduling LinkedIn posts allows you to plan your content in advance, adapt to real-time events, and ensure a consistent flow of posts. Try to stick to three tags to keep things neat.

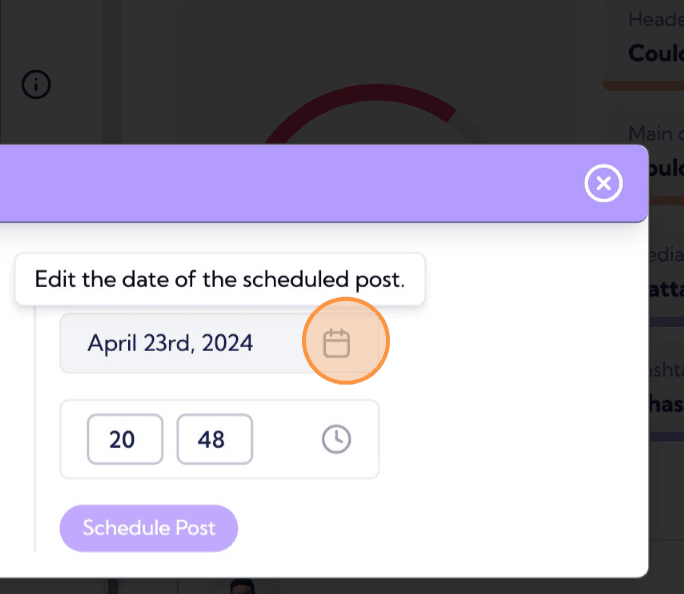
Step 6: Time Travel – Schedule Your LinkedIn Posts
Want your post to go live later? No problem! Look for the "Schedule Post" button and pick the perfect date and time. It's like setting an alarm, but way more fun because it’s for your post.
Step 7: Double-check and Edit Scheduled LinkedIn Posts
Take a moment to review everything. A glance can save you from typos or scheduling problems. Everything looks good? Awesome, hit that “Post” button. If you decide not to schedule for a later date, you have the option to post immediately, ensuring your content goes live without delay.
Step 8: All Set
And voilà! You're all set. Your post is scheduled and ready to roll out on your chosen date. Maybe set a reminder to check in when your post goes live, so you can see all the great reactions.
By following these steps, you’ll find scheduling posts on Vulse is not just easy, but also quite fun. Ready to get your message out there? Let's go.
Now that you’re equipped with the tools to schedule captivating LinkedIn posts, it’s time to unleash your creativity and make your mark on the platform.
With Vulse, scheduling posts has never been simpler, allowing you to focus on what truly matters – engaging with your audience and growing your professional network. So, what are you waiting for? Let your voice be heard and start scheduling those posts today.